Tuesday, November 12, 2013

Apple, apples and more apples


It's been a while since I posted my last blog entry and I am finally making my return into the blog-sphere. I took a longer a hiatus from writing than I actually planned to (and wanted to), with life seeming to have got a little bit more hectic than I anticipated. The good news is, in the last few months I have successfully completed my Culinary Arts Certificate at the Le Cordon Bleu in Cambridge by finishing my classes and completing an internship at the end of September. At the same time, I have had the opportunity to continue to work professionally at the catering company where I took my internship. So far, 2013 has really been quite a whirlwind with acquiring lots of new knowledge and positive experiences for me. And while I originally set up this blog to share my learning experience at college with you, I have now decided to expand the scope and keep talking about food and cooking in the kitchen in the hope that you will benefit from my expanding knowledge as much as I do. So, “turning pro in the kitchen” perhaps does not mean professional but increased proficiency for you.
Because of my seasonal and currently somewhat unpredictable work schedule, I am hoping to post new articles once or twice a month rather than on a weekly basis. 

One of my favorite seasons in New England is the fall. From a catering perspective that means the wedding season is over and at work we are moving on to smaller events and indoor venues. From a food perspective it’s all about the use of autumn fruits and vegetables. This year for me that means apples, apple and more apples. Over the last couple of months I have re-discovered and become totally infatuated with apples in all of my dishes, sweet or savory. My obsession started with our visit to Nashoba Valley winery on a gorgeous late summer day in September where we took part in a wine tasting and picked apples from the orchards, something that I hadn’t done since I was a child. The taste of an apple fresh from the orchard reminded me of what apples are supposed to taste like.


I started cooking and baking with the ones we brought home from the orchard - apple compote with vanilla sauce, mini apple tartlets, pork with apples in a cream sauce, dried apple rings, etc. And of course, I couldn't let the season go by without an apple-themed dinner party. Every course had to have some apple component to it.
Apple cider spiced peanuts
The spiced pecan nuts, I prepared were sauteed in a little apple cider. The butternut squash soup, I served as first course, was based on a recipe from the New York Times and included a tart apple pureed in the soup. It gave it a nice contrast to the roasted and slightly sweet butternut squash. For the main course I prepared a center cut pork loin roast that I brined in apple cider and roasted with onions, potatoes and apple pieces. The meat was moist, flavorsome and very delicious.
Last but by no means least, for dessert I chose an easy but very tasty apple bake. The meal made for happy guests and great conversation.
Butternut Squash soup with apple and sage
Cider-brined pork roast with roasted apples

Apple Clafoutis


Following the dinner party, I thought I had somewhat exhausted the subject of apples for this season, until I saw “The Apple Lovers Cookbook” by Amy Traverso.  With the help of the very consumer friendly “1-Click” button of a big online bookstore it took me less than 30 seconds (how scary is that?) to be the proud new owner of my very own copy which since has become my new favorite fall cookbook. If you love apples and you want to expand your knowledge beyond the boring and somewhat watery tastes of the 4-5 common varieties of apples we can now buy year-round in the supermarkets, than this book is a must-have for you! Did you know that there are about 150 different varieties of apples grown in the New England region? Many varieties I had never heard of and most of which I had never seen in the supermarkets. Until last week that is. To my pleasant surprise, I found some of them at my local market the other day. 
My fruitbowl
You can see in the picture, every variety in the bowl is labelled so that I would be able to study them and use them in accordance to their flavor, texture and baking/cooking characteristics. My husband didn't believe it when I asked for pen & paper in the store. The great thing about the apple cookbook is, that Amy Traverso categorizes approx. 60 varieties of apples into four categories - Firm-tart;Firm-sweet; Tender-tart; Tender-sweet. Each of her recipes than refers you back to the appropriate category and leaves you the option to use any of the apple varieties listed in the four categories. For me this approach has proven a fantastic way to learn more about various apple varieties available. And you probably know by now, I am always up for learning something new about cooking.

Pork baby back ribs braised in dry apple cider
Well, while I have been writing this post, the first snowflakes have been dancing in the air and I felt I needed some comfort food to go with that. And what could be better than cider braised pork baby back ribs with caramelized onions, carrots and apple slices. 
 Happy eating everybody. :-)

Sunday, June 2, 2013

Bread, croissants, cookies and more

Chocolate Chip Cookies
The last two weeks have been a whirlwind and I know I owe you all an apology for not posting a blog last Sunday.
In my last posting, I was about to start my Baking&Pastry Module. I've been looking forward to that particular module for quite some time and it (the module) didn't disappoint. We have been baking and baking and baking all kinds of foods; french bread, croissants, danish pastries, cookies, scones, biscuits, etc, etc. And everything is delicious.
Now, obviously as great as it is to end the finished baked product, the knowledge I have gained so far about the ingredients and their interaction either during the mixing or the baking process, has been invaluable.  Did you know that too much sugar in a cookie makes them spread during the baking process, but that too little sugar makes them crisp rather than nice and chewie? Did you know that you can measure water, milk and eggs by volume because they weigh 1 pound per pint (or 1 kilogram per liter)? I could create a whole 'Did you know section?' section here for you. But we don't have that much time. I guess the most valuable thing one can be taught in a 6 week baking crash course, is how to apply certain mixing techniques to different recipes and being able to create consistent products.


Finished Pan d'Epi
Pan d'Epi before baking
My favorite recipes so far have been the yeast based bread recipes and the laminated-dough recipes for croissants and danish pastries. OMG, the results were so good. I love good french bread and french pastries, but I never thought I would be able to produce them myself.
Any yeast-based dough production can be broken down into a 12 step process that when applied correctly makes yeast doughs very easy to understand and produce. Of course the 12 step process is no guarantee that things can't go wrong, but it gives structure to a recipes that can seem daunting otherwise; for example french baguettes or croissants. The french Pan d'Epi (wheat stalk) artisan bread is very impressive to look at, but also very easy to make. It is a french baguette that is cut and shaped in the form of a wheat stalk just before it goes into the oven. The advantage of this style is that it lends itself for use at picnics, parties etc, because it can be broken into individual pieces very easily. No knife required.

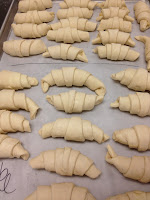
Rolled croissant dough
Baked Croissants ready to eat
The principles of the 12 step process can also be applied to the production of croissants and danish pastries because the dough is yeast based, but it has the added difficulty of being a laminated dough. Laminated (or rolled-in) doughs contain many layers of fat that are sandwiched between layers of dough, creating the flakiness that is desired in a croissant for example. There are two slightly different techniques to creating the flakiness in the dough, but both require a lot of fat (in most cases butter is desired) to be rolled into the dough. For a recipe that asks for 3 lbs of flour will also ask for 2 lbs of butter to be rolled into the dough. A hefty caloric price for the divine taste of a croissant. And I am only talking about a plain croissant, never mind one with an almond or chocolate filling. My freezer is currently full with samples of the filled versions.


Common shapes for danish pastries

Filled danish pastries
The same goes for a danish pastry. Although the dough itself it usually a little bit more flavorsome to start with by adding eggs and spices such as ground cardamom to the original dough mix. The filling shown here, on the left, is cream cheese that is added after the dough is shaped in the form desired (see picture on the right). After the baking process we  applied an apricot glaze and some icing. Looks good, right? Tastes even better, trust me.
In addition to the baked goods described, we produced scones, biscuits, muffins and more. So, here are a few pictures of the goodies and I promise I will go into the steps of preparation at some other time, perhaps in more detailed individual posts.
Spritz Cookies

Biscuits with Ham & Cheese

Focaccia dough ready to be baked
Soft Rolls

Scones

I did weigh myself at the start of this module and, although don't count on me revealing my weight to you in this blog, I am planing to let you know truthfully whether I have put on pounds or not at the end of the Baking&Pastry module. Particularly since I am not getting my usual exercise either. Some of you already know that in addition to attending culinary school, I have also started working at catering company which keeps me pretty busy at the moment. That may have the consequence that I will not be able to continue to write my blog on a weekly basis, but it may have to be every two weeks from now on. I will en-devour to write as often as I can, but please be patient with me for the next two months or so. Once I start my internship and do not need to attend early-morning classes at school anymore, I should be able to return to a weekly schedule.

Happy eating everyone.


Sunday, May 19, 2013

Another hurdle cleared

Another week has passed and with that I've successfully completed another module at culinary school. Culinary Foundations III (CF III) is over and I feel I really have grown as an aspiring chef. As you can appreciate from my previous posts, we did a lot of cooking in CF III, we had a lot of fun being able to modify the recipes and bring our own creativity to the dishes we've cooked. But my favorite thing was creating the food for those Communal Breakfast Days. Rather than everybody preparing their own dishes, we worked together as a team, we created the menu as a team and we usually produced an amazing amount of food in the time allocated.

So last week, we prepared our final breakfast menu. This time the subject was seafood. We cooked dishes with shrimp, squid, clams and lobster; we shucked oysters, and we ate far too much of the food ourselves. But it was delicious.

Seafood Buffet

Shrimp Gumbo

Grilled Squid with Herbs & Potatoes

Coconut Shrimp


The day before the Seafood Buffet, we talked about and then cooked with Scallops and Mussels. I had to shuck the biggest scallop I have ever seen as it was delivered still in its shell. Did you know that the scallop swims? I didn't, but our Chef Instructor showed us this cool video on YouTube. Scallops have eyes and open and close their shells like a mouth when they swims.

The scallop taken out of its shell and before it is cleaned up

Pan-fried scallop on a bed of tomato sauce

Moules Mariniere with home-made linguini
It feels like we've cooked our way through the animal kingdom over the last 6 weeks and now it's time for a change of subject. Tomorrow morning I will be starting my Baking&Pastry Module. That means for the next 6 weeks you will hear a lot about flours\, baking temperatures, baker's ratios etc. and you will see lots of mouthwatering pictures of breads, cakes, scones, eclairs etc. So, brace yourselves and have that extra candy bar handy should your sweet tooth demand feeding when reading my blog postings over the next few weeks.

Happy eating everyone.

Sunday, May 12, 2013

Who doesn't like a home-made sausage?

I like sausages. I grew up with all types of sausages, some better than others. But none were ever home-made and over the last few years, I have been wondering more and more about the content of those commercially produced sausages? So, these week, when we made sausages from scratch at culinary school, I was very exited and couldn't wait to get started. The 3 main ingredients are lean meat, fat and salt. In addition to that one can add spices, herbs and other cooked or uncooked flavorings. We decided to produce two types; a sweet and spicy Italian sausage and a maple flavored  Breakfast sausage.

We started off with 11 lbs of pork shoulder that had to be separated into lean meat and fat. The reason the fat and lean meat is separated is that one can weigh each precisely. We prepared sausages with the most common ratio of 70% lean meat and 30% fat. There are products out there who will have a lower ratio of lean meat vs fat (up to 50% : 50%) and there are low-fat products that may have  only 10-20% fat. The interesting thing I learned about those, is that the missing fat percentage is replaced with cereal-based fillers such as rice, barley, bread crumbs etc which will obviously not only change the taste of a sausage but also it's nutritional value.


Once we had created the right lean meat - fat ratio, we mixed in spices and a curing agent. That mix was chilled in the refrigerator until we were ready to grind it. When making sausages it is important to continuously keep the meat AND the grinding equipment chilled. If the mixture gets too warm, the risk is that the fat becomes soft and starts to lose it's structure. Which in turn means it may melt more easily during the cooking process, creating a dry, shriveled sausage.


After the meat had been ground and mixed further, we returned it to the refrigerator and let it cool overnight. The next morning we set up the sausage feeder and prepared the natural casings for the sausages. Natural casings are made from animal intestines and in our case we used pig casings. They are supplied packed in salt which is acting as a preservative and hence need to be rinsed and flushed through.  Trust me it sounds worse than it is.
When that was all done we started filling the casings which is quite an art in itself. They cannot be filled too much otherwise they split but also shouldn't have too much air in them because it will make the sausages 'spit' and burst when cooking. We eventually became quite skilled at the process and produced a number of different shapes as you can see in the pictures. It turned out to be good fun and it is quite satisfying seeing one's work taking shape; literally.

We decided to poach the sausages before putting them on the grill so we would know that they were cooked all the way through without being too charred on the outside. We were advised by our Chef Instructor to inspect the sausages and pierce any air pockets we could find. That worked out very well. None of the sausages burst during the poaching process.  The poaching liquid included a bay leaf, a clove of garlic and a quarter onion which gave it just a little bit of flavor. It takes about 10 mins or so (depending on their thickness) for the sausages to cook all the way through without overcooking them, in which case there is a danger that they will become dry.

Now it was time to switch on the grill and give the sausages a bit of color. Don't they look tasty!?!?!

One other way to use sausage meat is obviously to turn the mixture into patties or as in my case into sausage gravy. I had decided to prepare biscuits to go with the sausages but had no experience with sausage gravy. It is a classic Southern breakfast dish and I needed help. So, under the guidance of my Chef Instructor, I prepared the sausage gravy, which is basically a white Bechamel sauce with minced sausage meat. A very foreign concept to me, but after a few tastes I started to see why one could be fond of it. The final gravy certainly received the thumbs up from people who where more familiar with it than I am.
And so we had a very happy breakfast with lots of tasty sausages, sausage gravy, yummy biscuits, and satisfied students and teachers. As I said, who doesn't like a home-made sausage?


One more thought. The added bonus of a Communal Breakfast Day is that the students from the 'Baking&Pastry' track are usually very grateful to get some food and reciprocate by sharing some of their goodies.
On mornings like these, life can hardly get better.
Have a great week and happy eating.


Monday, May 6, 2013

Food, food and more food

Sometimes, for me, the best thing about culinary school is just simply eating the food we prepared. I know that statement sounds wired but it's true. On days like these, it is less about how we prepared the food, and more about sitting together and enjoying the food. Appreciating it and talking about it with our mouths' full, complimenting each other on how great the food tastes. These days are know as Communal Breakfast Days and we, the students of Culinary Foundations III, prepare the food for the rest of the school. The Burger breakfast I talked about a few blogs back was such a day and last Tuesday we had another breakfast buffet to prepare.  The theme was 'Carnitas with all the trimmings'.

Zucchini filled Poblano peppers

A selection of salsa, guacamole and Queso Frier

Tortilla chips

Buffet style - everybody help themselves

Beef filled Empanadas

Dominican Beef dish

More food

Apple filled Empanadas

Doesn't that all look yummy?
Obviously, each of us had our own favorite dish out of the huge selection of food we prepared.  For me it was the apple filled empanadas.

One thing I'd like to add: none of the pictures I am uploading for this blog are staged food shots. They are what one would call snaps shots of the food prepared and presented at school, in all it's glory with all it's faults. So, if something looks a bit odd, it is probably due to the fact that I am still a culinary student and not yet a chef .

Oh, by the way, Wednesday is scheduled to be another Communal Breakfast Day; this time we are preparing sausages. Can't wait to share those photos with you.
Until than, have a great week and happy eating.

Sunday, April 28, 2013

A Pig's tale

With everything that we are cooking at school during this module, I had to create a rule for dinner at home; meat dishes we've cooked at school alternating with vegetarian dishes cooked at home. Otherwise we would be eating meat, meat and more meat. I know for some of you that probably doesn't sound so bad, but my husband and I have been trying to eat a more plant-based diet; for health purposes and environmental reasons but also last but not least for cost reasons. Meat is expensive, particularly since I prefer to buy quality meat and usually cook with widely available but relatively expensive cuts of meat, such as beef steaks, lamb shanks or pork loin roast.
Hence, it's been quite refreshing this week to take a look at the nose-to-tail approach when consuming an animal. It is a concept which has found increasing support over the last few years amongst chefs but I believe less so with the home cook. Liver, sweetbreads, tongue, tripe, tails and other organ and muscle meats are defined as variety meats and to most of us they are probably better known as offal.

Two of the recipes this week included the challenge of transforming pork tails and sweetbreads into appetizing dinner plates anybody would want to eat. I have to say, once I got over the fact that I was dealing with offal it was actually an enjoyable and interesting cooking experience.
BBQ pork tails
Pork tails have relatively tough meat and a thick fat layer under the skin, so they lend themselves very well to braising. Braising is a cooking method, where the meat, together with some vegetables and liquid, is cooked in a covered pan in the oven until the meat is tender. In this case it took somewhere between 2-3 hrs to braise the meat. In the meantime, I prepared a BBQ sauce with which  to glaze the pork tails and serve them with a side of vinegar-based coleslaw and home-made biscuit. Voila, one tasty pork tail appetizer.


Pan-fried Sweetbread
Poached Sweetbread
The sweetbread proofed to be a bit more of a challenge because it is so delicate. I had to find the right balance between getting a crunchy texture on the outside and, at the same time, not to over cook it on the inside. I pan-fried my portion of sweetbread with a little butter and lemon juice which gave it a nice flavor, but I wasn't thrilled with the texture of the actual sweetbread. It surprised me because I thought I would like it. My mother used to sometimes prepare brains when I was a child and I remember being very fond of it. But that was years ago ....

Before we launched into our Offal adventures this week, we started on Monday with the most  fabulous beef burger and potato fries for breakfast. Prepared the 'Heston Blumenthal' way! For all of you who would like to know more about this genius of a chef, check out 'How To Cook Like Heston' on YouTube. It is food science explained in an interesting and fun way.
We prepared the burgers from scratch and we decided to grind three different cuts of meat (tenderloin, chuck and short rib) to compare the different flavors  and textures of each cut. It made for a very interesting burger tasting. The majority of us, including myself, favored the burger made with short rib. It was the most flavorsome burger I have eaten in a very long time and from now on will be my favorite cut of meat for beef burgers. Include some pickles and bacon and you've got a great, great burger.
However, no such breakfast would be perfect without a side of fries. And here again we looked to Heston Blumenthal for inspiration and prepared the triple-cooked fries. The most common way is to cook fries twice, both times using an increasing temperature of hot oil in the fryolator.  Blumenthal adds an extra step by boiling his potatoes first and letting them cool in the freezer before frying them twice in the hot oil. It creates the perfect combination of a crunchy fries with a soft, velvety center. Incredibly delicious. Just thinking about it makes my mouth water. Yummy, yummy!
After such a gorgeous over-indulgence at breakfast, I did not need to eat for the rest of the day.

As you can see it's been another fabulous week at school and I can't wait to get cooking again on Monday. It will be Mexican Monday with carnitas, guacamole and tacos!  One more favorite cuisine of mine.

Have a great week and happy eating.